Distributed Rendering
Garry Curtis Tutorial - Realsoft3D February 09 2006
- 1 One User's Advice for Activating Distributed Rendering
- 2 Introduction
- 3 Maybe The Manual's Advice Works For You ?
- 4 Here's What You Need to Do Before We Begin
- 5 Meat of the Matter
- 6 That's it For this Computer !!
- 7 Switch to Your Main Computer
- 8 Post Processing
- 9 Things to Consider
- 10 Setting up a renderfarm using PRS
One User's Advice for Activating Distributed Rendering
February 09 2006.
A tutorial for Realsoft3D V5+
Beginner level.
Introduction
Maybe you looked in the V5.x manual and have tried to get Distributed Rendering going ... with no luck ... maybe had some crashes ... might have asked for advice on the Mailing list . Perhaps ( like myself ) you simply put it down to not working because of a mix of AMD and Intel processors ! Well then , this tute's for you !
This is What You Want To See ... Correct ? '
Maybe The Manual's Advice Works For You ?
If the V5 RS Manual works for you then great ! I think it does work for most people without too much trouble . The Realsoft3D development team has put a fair amount of time and effort to try and make this a complete no brainer . Still , every once and a while someone will show up on the Realsoft mailing list asking for help with this unique area .
To anyone having unknown trouble with Realsoft Distributed Rendering Setup This tutorial may be able to provide a solution .
Here's What You Need to Do Before We Begin
- 1) The RealSoft Manual goes into quite a bit of detail in order to help you . Chances are that detail is not required for your simple 1 or 2 or 3 node setup anyway , and in fact may just be getting in your way if you don't understand the terminologies being used .
- 2) Start from scratch . Whatever you have done ... please undo it . Go back to Square 1 and just make sure your network can share files normally and without problems . If you cannot share files then stop this tutorial right now ! You need specialised help and as much as I feel for you I cannot provide that help for you here . You need to get help elsewhere ... but then by all means come back here and carry on with these next few steps . Good Luck and god speed !
- 3) If all is well with you so far . then congrads and please do proceed to the most important section (next)
Meat of the Matter
It's actually so simple ! The main thing is that you know the names of the computers on your network , and that is very easy to do . Second to that is the Firewall issue's on your computer network . Then lastly we will delete the one single line in an Input Field that MAY be causing you trouble too !
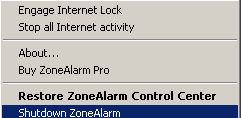
- First! Turn off your Internet connection and disable any and all Software Firewalls (turn them off) in case they block Realsoft3D's attempt at comunicating . Later , once we have the Distributed Rendering working 100% we will turn them back on to see if they can be re-activated .
Throw Down Your Firewalls !!
- We need to absolutely know exactly the name of our Rendering Node's Computer Name . Follow these easy steps just to be sure we are typing it correctly .
- In XP open the Control Panel and select System and once on that Multi-Tabbed Panel just ignore everything and Select the Computer Name Tab .
- Look closely on that Tab and you will see a Control Box near the center labeled Change . We are certainly not going to change anything , but are here to observe computer names only , but in order to observe here we will simply click that Change Control Box but will not change anything but will memorize the name or write it down somewhere .
Do Not Make Changes Here ... Just Observe !
- Observe the computer name of this particular rendering node , write it down or memorize it , and then Click Cancel and close the System Panel .
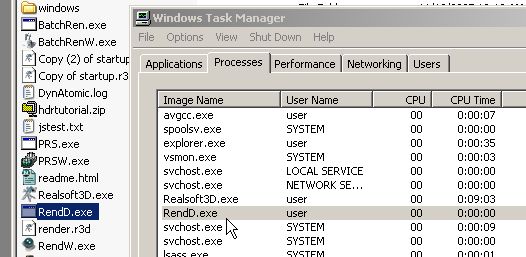
- The last thing we will do on this computer is locate one file and double click on it . The file is RendD.exe and it's in your Realsoft3D directory . Double cick it and then open your Windows Task Manager and go to the Process Tab and locate it there just to make sure it is actually running ! Never Assume !
Check Computer Name and that rendD is Running
That's it For this Computer !!
You'll notice that we didn't even touch Realsoft3D at all on this (or any other) Rendering Node. No need to even start the main Realsoft3D program . RendD.exe will take care of everything for us , and as a matter of fact , I'll show you how to add RendD.exe to your Windows startup directory so that you won't even have to do that step from now on !
Switch to Your Main Computer
This is the where we will make the Distributed Rendering work for us . The previous steps on your rendering node may have seemed tedious but they were really just to make sure we did not leave anything to chance . Now that , that is done we can make it happen for us . Yahoo !
- Start up Realsoft3D . Let's load a scene that features both some nice raytracing as well as some Post Processing . This way we can make sure all processors are running full blast ! during the raytracing part , but will also notice that on the Post Processing step that only our Main Computer's CPU will be used (and only one of those if our Main Computer has 2 or more) .
- So load Samples/Photorealistic/Skin (via the loader or directly from the Samples Pulldown Menu (along the top of your RS interface) . Locate the scene's camera object and Drag and Drop it into your viewport window .
- Go to the Rendering Settings Tab of your select window and double click on Gi Rendering . We can use Distributed Rendering for any one of the Rendering Settings of course (even Material Previews) but for this built in scene we will use the available Gi Rendering for our example .
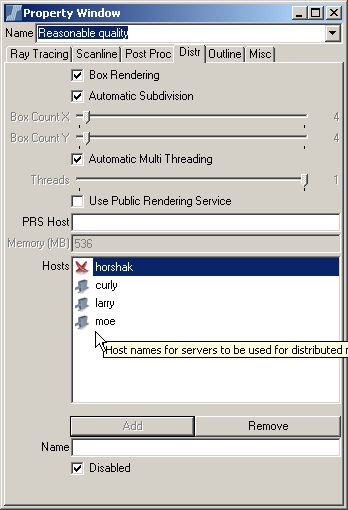
- Select the Dist Tab on the Property Window that popped up for you . You'll notice a few things are already selected for you here . These check boxes are selected automatically by Realsoft3D to make things easier for you , so just leave them for now , and just notice that the Use Public Rendering Service Check Box is unchecked .
- This Rendering Service is the one we're going to focus on right now . Leave it unchecked ! This is not related to our simple network rendering situation , and asccidentally checking it could lead to a crash of Realsoft3D .
- Almost done ! Below the PRS Host Field , near the bottom of this Property Window is another blank Field labeled Name . Just type the (previously established) Computer Name of your rendering node here -- exactly -- and Hit Enter to add that Computer Name to your List of Hosts (computers that will be used for distributed raytracing) .
Add the Computer Name of the Rendering Node Here .
- Now Drag and Drop the modified Gi Rendering Settings into the Viewport to make certain that all our changes have been added to the rendering pipeline (not required but remember we are playing it all very safe here !) . Notice we did not add the name of our Main Computer since Realsoft3D will do that for us anyway . However , if we have other rendering nodes (that have RendD.exe running on them) we can add them here now , if we like .
- Hit the Render Button ! .
- Switch back to your rendering node(s) and have a look at the Windows Task Manager Performance Tab and we will notice that this rendering node has been automatically activated and is running at around 100% ! Switch back to our Main Computer and watch the screen render .
- You can activate the Windows Task Manager Performance Tab on this Main Computer too , just to make sure that everything on this side is working fine .
Post Processing
Let's let this scene render away , unless you're anxious to stop it and add the other 69 rendering nodes you have on your network ! (In that case just go back to the top) If you watch the Realsoft3D Status Window update it's progress (at very bottom) on raytracing this scene , you'll notice that once the Post Processing begins that only one single computer processor (in all our vast collection of CPU's) is being used ! That's correct ! As of this version of Realsoft3D Post Processing is not multi-threaded .
Things to Consider
- Expect to get around 90% of the actual power of your rendering nodes . The missing 10% is simply network overhead , I would guess ? Mind you , my tests with only 2 computers ( 1 dual and 1 laptop ) show that I'm getting close to 95% efficiency , according to my math and using this Realsoft Benchmark. Your results may vary and some of it is network related and some of it could be other factors too .
- If you have scene's with a lot of Post Processing you may want to look at splitting the rendering task up into sections , with computers receiving the amount of full complete frames that they can handle in a certain time frame (slower computers get a lesser number of full complete frames) . This way CPU's are not sitting idle while the one fast powerfull single CPU Main Computer does the Post Processing for the whole project. But you must take care that some postprocesses like depth of field cause artefacts on the edges of the boxes. To avoid to show these artefacts you must enable the 'safety area' on the post proc tab in the render settings. The size of the safety area depends on the post effect configuration. For example, if you apply GI filtering which includes a blur filter which has size=10, iterations=5, the safety area expands render boxes 50 pixels to each direction. So, a 200 pixel wide render box is internally rendered 300 pixels wide.
- If your Firewall is not letting you Distribute , turn off your Internet connection while Distributing until you figure out why not . This way you can keep hackers out until you sort that issue out with your Firewall S/W's Tech support people .
- If you're getting an error message about RS being unable to connect , probably due to texture paths etc , then it is probably due to an install of Realsoft3D on another partition other than the default install . I , myself have RS on a D: drive on one R Node , and on an E: drive on another . However , on all nodes I do have realsoft3d/Textures folder on the C:drive and this seems to be enough to allow RS to find the texture automatically .
- Never assume that your Nodes are rendering and check them using the Windows Task Manager utility . RS will probably send you an error message of some kind if they're not , but it's always good to double check if you can .
- About setting the amount of boxes. Instead of letting the system automatically define the amount of boxes you can set it manually. The optimal setting is to create as much boxes as needed to let all the nodes finish at approximately the same time. You must avoid that one node is still rendering a long time while all the other boxes are finished. But when you create too many boxes, the overhead on communication and combining the boxes makes the process less efficient.
Setting up a renderfarm using PRS
In a local situation there would be one workstation and some different servers. Of course one could start RendD or RendW on each machine and enter the names of the servers in the hosts list in the render properties manually. Just like the setup above. But when you change from workstation or maybe you work on a laptop now and then, this is not very convenient. You'll have to alter the list of servers in the rendersettings all the time. If at a certain moment one server is not available you must not forget to mark it as disabled. So let's move on to using PRS. PRS is a kind of supervisor that reports to the user which servers are available. You don't fill out each server manually but you ask PRS which ones are available and the servers are put in the hosts list automatically.
From now on we will not use RendD but RendW, as in this utility you can fill out the proper settings. To let this work you must tell RendW that it should report itself to the correct PRS. There's one important thing to remember: The PRS must be started first. When you start RendW it must be able to find the PRS. If it can't find it, the "Make Public" checkbox in the "Public Rendering Service" section will remain unchecked. When the PRS was started later you can still check this box to "repair" the connection.
To illustrate such a setup let's take some machines and names:
- Sun (this will be the machine that's always on, and fully dedicated to control the renderfarm)
- Earth (the workstation on which you create your scenes)
- Moon (another machine in your network)
Garry Curtis 10:50, 11 February 2006 (CET)


